Introduction
In the previous chapter, we took at look at Fuse's Navigator and Router classes and used them to tie our app's views together and send data between them. However, up until this point, our EditHikePage hasn't been able to actually make any lasting changes to our data model. For example, if we select a hike and make changes to it, then navigate to another hike, and navigate back, the changes we made will have been lost. This is because these changes are only made locally in EditHikePage's view model, and never make their way back to our model.
But now that we've got much more of our architecture figured out, it's time to start tackling this problem. We'll do so by implementing a mock backend, which is a module that will act like a real backend, but will just store some data locally in our running app instead of persisting it on the device's storage or in a database somewhere.
Building a mock backend like this isn't strictly necessary when building an app with Fuse. We could just as well pick an existing backend solution, for example, and build our app against that directly. But because this tutorial is meant to be as general as possible, we want to present these concepts in a general, backend-agnostic way so we can focus on the core concepts rather than the details of a specific backend. This will be a good exercise to do at least once so that we can understand what to expect when hooking our app up to a real backend in the future, regardless of which backend solution is actually used.
Note: once we've finished publishing this tutorial series, we'll be extending it with various "tracks" that will cover replacing our mock backend with integration with specific backend solutions, as well as many other cool things, so stay tuned for that!
Additionally, we'll create a thin abstraction over the mock backend which our view models will interact with instead of using the mock backend directly. This way, if we change how our mock backend works or replace it with a real backend, none of our view models should have to change; we can just update our abstraction to interact with the new backend and still provide the same interface it did before. We can also take advantage of having this abstraction by filling in features our [mock] backend might not have, such as object caching.
But before we start building anything, we need to consider what the interface to a typical backend might look like. So let's dive in and take a look!
The final code for this chapter is available here.
Typical backend interface
Backends can be quite complex and how they look/behave can vary a lot, but their most basic interfaces tend to be fairly similar across the board, especially if we're only after a few core features. For example, we can ignore things like initialization, signup, authentication, etc., as those parts will be highly backend-specific, and are features we're not concerned with in our basic app. For our simple app case, we really only need some simple data storage/retrieval and a way to update that data. With these features in mind, a simple backend interface might look something like this:
// Returns an array of item objects
function getItems() { ... }
// Updates an item
function updateItem(...) { ... }
Then, our app would use this interface in a very straightforward way:
// Get the item objects from the backend
var someItems = getItems();
// Update one of the items in the backend
updateItem(...);
This should be straightforward enough. However, we've ignored a very important detail that most (if not all) backends have to deal with: distribution. Our simple interface should work just fine if we already have the data locally, but what if the data is stored on a server somewhere else? We can't have our code just stalling, waiting for the backend server (or disk, etc) to respond with the data we asked for. It could take an indeterminate amount of time for our requests to get to the backend and for the backend to send data back. So, retrieving and updating the data should happen asynchronously. And, in JavaScript, when any asynchronous computations are involved, it's very likely you'll find a Promise or two nearby.
To paraphrase MDN's article about Promises: "A Promise represents a value which may be available now, or in the future, or never." This is a pretty basic explanation of what a Promise can do for us, but already from that description, we can see that this fits our use case of asynchronously communicating with our backend. With Promises, our typical backend interface looks more like this:
// Returns a Promise that represents an array of item objects
function getItems() { ... }
// Returns a Promise that will be fulfilled when the item is updated in the backend
function updateItem(...) { ... }
From this, it doesn't look like our interface has really changed at all! Of course, actually using these functions (and implementing them in the case of our mock backend) is slightly different, but not by much. For example, the code that uses this interface could look something like this:
// Get the item objects from the backend asynchronously
var someItems = [];
getItems()
    .then(function(items) {
        someItems = items;
    })
    .catch(function(error) {
        console.log("Couldn't get items: " + error);
    });

// Update one of the items in the backend asynchronously
updateItem(...)
    .catch(function(error) {
        console.log("Couldn't update item: " + error);
    })
To properly use a Promise, we have to introduce some of our own asynchronous code. The simplest way to interact with a Promise is by calling two of the functions it provides: then and catch.
By calling the then function, we can describe what will happen when the Promise is fulfilled. We do this by passing in another function that optionally accepts the value the Promise is fulfilled with; in this case, the items from the backend. This argument is optional, though. For example, in the case of our updateItem function, the Promise it returns isn't meant to yield a value when the update is complete. We only care about whether or not the Promise was actually completed, so the argument wouldn't be used in this case.
By calling the catch function, we can describe what will happen if an error occured while trying to fulfill the Promise. In this case, we can pass in a function that accepts a description of what caused the failure. For example, a real backend might report an error if it can't connect to the backend server, or authentication failed. Error detection/handling is a complex topic, however, so for the sake of keeping things simple, we're going to skim over a lot of these details. But we'll still want to attach some simple error handlers to our Promises so we have them if we hook up to a real backend later.
There are many more features Promises provide, and they're very useful. But this short description should clarify all we need to know to build and use our mock backend, as well as grok the interfaces of real backends later on.
Now, some of you might have noticed something interesting, and that is how similar Promises look to Fuse's Observables that we've already been using. An Observable represents a value that can be changed and observed, which also fits for our asynchronous interface. Indeed, if we wanted, we could use Observables instead of Promises to mock our backend interface, as their semantics are quite similar. And, if you're building a backend that targets Fuse specifically, this is encouraged, as it makes integration with your backend trivial! However, since many backend solutions have been built to support more platforms than Fuse, it's highly likely that we'll be interacting with an interface that gives us Promises instead, so we'll want to design our mock as if that were the case. Fortunately, because of the similarities between Promises and Observables, bridging the gap between the two is pretty straightforward, as we'll see later.
Note: you can learn more about
Promises in this guide over at MDN, and the A+ promise standard which describes the flavor ofPromises that Fuse conforms to specifically.
All in all, using Promises, we've arrived at a fairly good approximation of what a typical JS-based backend interface will look like, so this is what we'll use to model our mock backend.
Implementing our mock backend
Note: Keep in mind that we'll be moving things around a bit in our project, so we won't be able to compile and/or preview for a while, but we'll be back up and running by the end of the chapter.
Before we start implementing our mock backend, we'll want to talk about how we'll organize our JavaScript moving forward. Currently, we only have one standalone JS module in our project (besides our view models of course), and that's our hikes.js file. Since we'll be adding some more modules, we'll want to make sure we keep our project nice and organized. Similar to our Pages folder, where we placed all of our files pertaining to the different pages in our app, let's create a Modules folder at the root of our project where we'll place all of our standalone JS modules:
.
|- MainView.ux
|- Modules
|- Pages
|  |- EditHikePage.js

...
The next thing we'll do is make sure Fuse knows about our modules in this directory. Previously, when we added our hikes.js file to the project, we added a reference to it in our project file (hikr.unoproj) so it would be bundled with our app. Now that we've created our Modules folder, we'll replace that entry with one that will include every JavaScript file in the Modules directory as a bundle instead:
...

  "Includes": [
    "*",
    "Modules/*.js:Bundle"
  ]
}
Now we're ready to start implementing our mock backend. Since our old hikes.js file already contains all the data we'll need to present, we can use it as a starting point. First, we'll move the file into our Modules directory, and then we'll rename it to Backend.js.
If we take a look at our new Backend.js file, it simply exports the hikes array as-is. But since this will be our mock backend, we'll want it to expose an interface similar to the one we discussed previously instead. This should look something like this:
// Returns a Promise that represents an array of hike objects
function getHikes() { ... }
// Returns a Promise that will be fulfilled when the hike is updated in the backend
function updateHike(...) { ... }
We'll create our getHikes function first. Below our hikes array, we'll start with an empty function:
function getHikes() {
}
If we wanted this function to return our hikes array, we could simply write something like this:
function getHikes() {
    return hikes;
}
But instead, we want the function to return a Promise which will be fulfilled when our hikes are ready to simulate fetching them from a backend. So, our actual getHikes function will look something like this instead:
function getHikes() {
    return new Promise(function(resolve, reject) {
        resolve(hikes);
    });
}
Now, instead of returning the hikes array, we create a Promise using new Promise. The Promise constructor takes in a function that will be called in order to fulfill or reject the promise. This function takes in two arguments: resolve, and reject. These arguments are actually functions themselves. resolve is a function that fulfills the Promise we're creating, and if we attached a handler to our Promise using its then function, that handler will be called. In our code, this is all our function needs to call in order to resolve our Promise with our hikes collection. The reject function can be called instead if an error occurs, and any handlers we attached to our Promise via catch will subsequently be called.
We can also use JS' built-in setTimeout function to delay when this will actually be fulfilled by any number of milliseconds. setTimeout also takes two arguments. The first one is a function that will be called sometime in the future, and the second one is a number of milliseconds to delay before calling that function. For example, this code would resolve our Promise after half a second:
function getHikes() {
    return new Promise(function(resolve, reject) {
        setTimeout(function() {
            resolve(hikes);
        }, 500);
    });
}
This code is very useful if we want to test how our app deals with having to wait for data coming from the backend. However, to keep things simple for ourselves during testing, let's use 0 for the delay instead:
function getHikes() {
    return new Promise(function(resolve, reject) {
        setTimeout(function() {
            resolve(hikes);
        }, 0);
    });
}
Perfect, now we've got a nice getHikes function with a proper interface and some optional simulated delay!
Now for our updateHike function. This is a function that will take in some information about a specific hike to update in our mock backend, and return a Promise that will be fulfilled when the update has completed. We'll start with an empty function:
function updateHike() {
}
Then, we'll add some arguments to identify and update a specific hike:
function updateHike(id, name, location, distance, rating, comments) {
}
In this case, we'll use the id argument to identify the hike we want to update, and the rest of the arguments will be used to overwrite all of the corresponding fields on that hike.
Next, we'll use the Promise constructor and setTimeout just like in getHikes to return a Promise with an optional time delay:
function updateHike(id, name, location, distance, rating, comments) {
    return new Promise(function(resolve, reject) {
        setTimeout(function() {
        }, 0);
    });
}
Looking good! Now, we'll add the code to actually identify the hike by its id and update its members. To keep things simple, we'll just do a simple linear search to find the hike we're looking for:
function updateHike(id, name, location, distance, rating, comments) {
    return new Promise(function(resolve, reject) {
        setTimeout(function() {
            for (var i = 0; i < hikes.length; i++) {
                var hike = hikes[i];
                if (hike.id == id) {
                }
            }
        }, 0);
    });
}
Once we've identified the hike, we'll update its data with our function's arguments and break out of the search loop:
function updateHike(id, name, location, distance, rating, comments) {
    return new Promise(function(resolve, reject) {
        setTimeout(function() {
            for (var i = 0; i < hikes.length; i++) {
                var hike = hikes[i];
                if (hike.id == id) {
                    hike.name = name;
                    hike.location = location;
                    hike.distance = distance;
                    hike.rating = rating;
                    hike.comments = comments;
                    break;
                }
            }
        }, 0);
    });
}
Almost done. Finally, we'll make sure we resolve the Promise after the hike object has been updated. Since the Promise we're creating won't return any data, we just call resolve without any parameters, like so:
function updateHike(id, name, location, distance, rating, comments) {
    return new Promise(function(resolve, reject) {
        setTimeout(function() {
            for (var i = 0; i < hikes.length; i++) {
                var hike = hikes[i];
                if (hike.id == id) {
                    hike.name = name;
                    hike.location = location;
                    hike.distance = distance;
                    hike.rating = rating;
                    hike.comments = comments;
                    break;
                }
            }

            resolve();
        }, 0);
    });
}
And that about does it for our mock backend's interface. The last thing we'll do is make sure to export these functions instead of our hikes array, like so:
module.exports = {
    getHikes: getHikes,
    updateHike: updateHike
};
And with that, our mock backend is complete!
Our Context abstraction
As I mentioned earler, we could have our view models interact with our mock backend directly. While there's technically nothing wrong with that, it tends to be beneficial to build a small abstraction layer over the backend that our view models interact with instead. This helps us provide a more consistent interface to our model, and also allows us to implement things like caching to help reduce the amount of bandwidth and battery our app uses. So, the next thing we'll do is build this abstraction, which we'll call the Context.
To create our Context module, we'll start by making a new file in our Modules directory called Context.js:
.
|- MainView.ux
|- Modules
|  |- Backend.js
|  |- Context.js
|- Pages
|  |- EditHikePage.js

...
In this file, we'll import FuseJS' Observable module:
var Observable = require("FuseJS/Observable");And we'll also import our Backend module, like so:
var Observable = require("FuseJS/Observable");
var Backend = require("./Backend");
Notice how we imported the Backend module as ./Backend. Normally, when importing JS modules that are bundled in our app, we use the require expression and specify a path relative to our project's root directory to resolve the module. However, we can use relative paths to resolve a module as well. In this case, that's exactly what we're doing - we know Backend.js is in our Modules directory, which is the same directory as our Context.js file. So, using ./Backend works just fine.
Now for the meat of our Context module. The Context should provide our view models with a simple interface that makes it easy for them to consume and modify our app's data. Since we know our views will eventually display data from our view models via data binding, the Context should ideally expose our data via one or more Observables. So, we'll start with a simple hikes Observable:
var hikes = Observable();This Observable will be used by our view models to display all of the available hikes. When our app starts up, we'll populate this Observable using data from our backend, and as our app runs, this collection will essentially be a local mirror of the same collection in the backend. As we make changes, we'll update the contents of this collection so that our view models will get updated instantly. We'll also communicate with the backend, so it can update its information asynchronously.
When our app starts up, we'll call the Backend module's getHikes function and use the Promise it returns to populate our hikes Observable with its initial data:
var hikes = Observable();

Backend.getHikes()
    .then(function(newHikes) {
        hikes.replaceAll(newHikes);
    })
    .catch(function(error) {
        console.log("Couldn't get hikes: " + error);
    });
Notice how we use the replaceAll function on our hikes Observable to overwrite its contents with the contents of the array we get when our Promise is fulfilled. We've also attached a small error handler for good measure. This takes care of filling our hikes Observable with initial data from the backend on startup.
Next, we'll need to provide a mechanism for our view models to update the data as well. Similar to our mock backend, we can provide an updateHike function that takes an id to identify the hike to be updated, and the data to update it with. This function will both update our local hikes Observable (using a similar search the backend used to keep things simple and consistent) and tell the backend to update its data as well:
function updateHike(id, name, location, distance, rating, comments) {
    for (var i = 0; i < hikes.length; i++) {
        var hike = hikes.getAt(i);
        if (hike.id == id) {
            hike.name = name;
            hike.location = location;
            hike.distance = distance;
            hike.rating = rating;
            hike.comments = comments;
            hikes.replaceAt(i, hike);
            break;
        }
    }
    Backend.updateHike(id, name, location, distance, rating, comments)
        .catch(function(error) {
            console.log("Couldn't update hike: " + id);
        });
}
Finally, we'll expose hikes and updateHike in our module's exports like so:
module.exports = {
    hikes: hikes,

    updateHike: updateHike
};
And with that, we've finished our Context module as well!
Hooking everything up
Now that we've got our Backend and Context modules set up, it's time to refactor our view models to use these instead of the hikes module that we had before.
We'll start by migrating the HomePage. Since this page only displayed the list of hikes from the old hikes module, this will be pretty straightforward. We'll only need to make a couple changes in Pages/HomePage.js. First off, if we take a look at HomePage.js, the very first line imports our old hikes module. Let's change it to import our Context module instead:
var Context = require("Modules/Context");The only other thing we have to do is change the reference to hikes in the module exports to reference Context.hikes instead:
module.exports = {
    hikes: Context.hikes,

    goToHike: goToHike
};
And that should cover our HomePage.
Now for our EditHikePage. Because this page receives its hike data from the Router, this page won't need any changes to display this data. However, we will need to make some changes before we can actually edit the data. But to hook things up meaningfully, we'll want to set up the Save and Cancel buttons from our original design, rather than the temporary Back button we made in the last chapter:
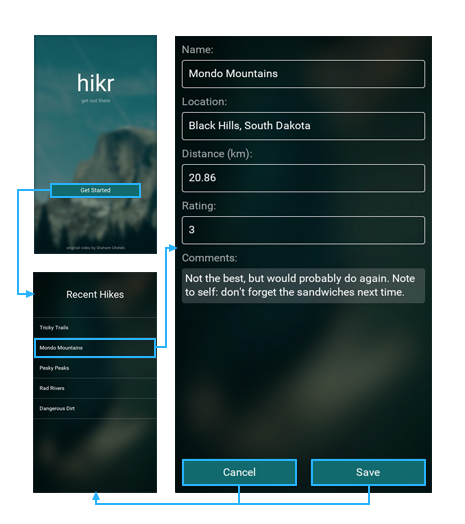
We'll start with the Save button. This button will be almost identical to the Back button we made previously, except that it will also commit the changes made in the editor to our data model in addition to going back to the previous page. So, let's start by simply renaming the existing Back button to Save.
First, in Pages/EditHikePage.ux, we'll change both the text of our button and its clicked handler:
    <Text>Comments:</Text>
    <TextView Value="{comments}" TextWrapping="Wrap" />

    <Button Text="Save" Clicked="{save}" />
</StackPanel>
Next, in Pages/EditHikePage.js, we'll rename the goBack handler to save:
function save() {
    router.goBack();
}
And we'll update its name in the module's exports as well:
    rating: rating,
    comments: comments,

    save: save
};
Finally, we'll make this button commit any edits we've made in the view. To do this, we'll call our Context module's updateHike function, passing in the id from our hike Observable's value and the data contained in our view model's Observables:
function save() {
    Context.updateHike(hike.value.id, name.value, location.value, distance.value, rating.value, comments.value);
    router.goBack();
}
Great! Now our Save button should be all hooked up. Now, let's implement the Cancel button as well. The Cancel button will be very similar to our Save button, except we'll have to cancel the changes we've made in the editor somehow. But before we worry about that detail, let's go ahead and make our Cancel button, along with a corresponding cancel handler for it.
We'll first add the UX code for the button in Pages/EditHikePage.ux right beneath the code we just wrote for our Save button:
    <Button Text="Save" Clicked="{save}" />
    <Button Text="Cancel" Clicked="{cancel}" />
</StackPanel>
Next, we'll add an empty cancel function and export it in Pages/EditHikePage.js:
function cancel() {
}

...

module.exports = {
    ...

    cancel: cancel,
    save: save
};
Then, we'll make sure the cancel function will take us back to the previous page by calling goBack on our Router instance, just like our save handler:
function cancel() {
    router.goBack();
}
Finally, before the handler navigates back to the previous page, we want to revert any changes we've made in the view model. There are a few ways we could do this, but one of the easiest is to take advantage of the fact that all of the backing Observables in our view model are the result of map's of our EditHikePage's hike Observable. Because of this, if we're to "refresh" the value of this Observable, all of the editor values will be reset to their original values. This can be achieved by simply assigning the hike Observable's value to itself, like so:
function cancel() {
    hike.value = hike.value;
    router.goBack();
}
Easy! Now, while this code makes sense to us now, it may not be immediately clear why we're doing this to someone who hasn't read the code (or us in the future if we've forgotten about this trick), so let's go ahead and add a comment to go with it:
function cancel() {
    // Refresh hike value to reset dependent Observables' values
    hike.value = hike.value;
    router.goBack();
}
Perfect! Now everything should be hooked up. At this point, we can go ahead and save all of our different files. Once Fuse is finished reloading preview, we finally can try out our fully-functional views!
Our progress so far
Finally, we've got basically all of the major functional pieces of our app in place and hooked up. Now we've got our various pages and modules working together in perfect harmony and fitted together with a nice, scalable architecture. It looks something like this:
And here's the code for the various files we modified in this chapter:
Modules/Backend.js:
var hikes = [
    {
        id: 0,
        name: "Tricky Trails",
        location: "Lakebed, Utah",
        distance: 10.4,
        rating: 4,
        comments: "This hike was nice and hike-like. Glad I didn't bring a bike."
    },
    {
        id: 1,
        name: "Mondo Mountains",
        location: "Black Hills, South Dakota",
        distance: 20.86,
        rating: 3,
        comments: "Not the best, but would probably do again. Note to self: don't forget the sandwiches next time."
    },
    {
        id: 2,
        name: "Pesky Peaks",
        location: "Bergenhagen, Norway",
        distance: 8.2,
        rating: 5,
        comments: "Short but SO sweet!!"
    },
    {
        id: 3,
        name: "Rad Rivers",
        location: "Moriyama, Japan",
        distance: 12.3,
        rating: 4,
        comments: "Took my time with this one. Great view!"
    },
    {
        id: 4,
        name: "Dangerous Dirt",
        location: "Cactus, Arizona",
        distance: 19.34,
        rating: 2,
        comments: "Too long, too hot. Also that snakebite wasn't very fun."
    }
];

function getHikes() {
    return new Promise(function(resolve, reject) {
        setTimeout(function() {
            resolve(hikes);
        }, 0);
    });
}

function updateHike(id, name, location, distance, rating, comments) {
    return new Promise(function(resolve, reject) {
        setTimeout(function() {
            for (var i = 0; i < hikes.length; i++) {
                var hike = hikes[i];
                if (hike.id == id) {
                    hike.name = name;
                    hike.location = location;
                    hike.distance = distance;
                    hike.rating = rating;
                    hike.comments = comments;
                    break;
                }
            }

            resolve();
        }, 0);
    });
}

module.exports = {
    getHikes: getHikes,
    updateHike: updateHike
};Modules/Context.js:
var Observable = require("FuseJS/Observable");
var Backend = require("./Backend");

var hikes = Observable();

Backend.getHikes()
    .then(function(newHikes) {
        hikes.replaceAll(newHikes);
    })
    .catch(function(error) {
        console.log("Couldn't get hikes: " + error);
    });

function updateHike(id, name, location, distance, rating, comments) {
    for (var i = 0; i < hikes.length; i++) {
        var hike = hikes.getAt(i);
        if (hike.id == id) {
            hike.name = name;
            hike.location = location;
            hike.distance = distance;
            hike.rating = rating;
            hike.comments = comments;
            hikes.replaceAt(i, hike);
            break;
        }
    }
    Backend.updateHike(id, name, location, distance, rating, comments)
        .catch(function(error) {
            console.log("Couldn't update hike: " + id);
        });
}

module.exports = {
    hikes: hikes,

    updateHike: updateHike
};Pages/HomePage.js:
var Context = require("Modules/Context");

function goToHike(arg) {
    var hike = arg.data;
    router.push("editHike", hike);
}

module.exports = {
    hikes: Context.hikes,

    goToHike: goToHike
};Pages/EditHikePage.ux:
<Page ux:Class="EditHikePage">
    <Router ux:Dependency="router" />

    <JavaScript File="EditHikePage.js" />

    <ScrollView>
        <StackPanel>
            <Text Value="{name}" />

            <Text>Name:</Text>
            <TextBox Value="{name}" />

            <Text>Location:</Text>
            <TextBox Value="{location}" />

            <Text>Distance (km):</Text>
            <TextBox Value="{distance}" InputHint="Decimal" />

            <Text>Rating:</Text>
            <TextBox Value="{rating}" InputHint="Integer" />

            <Text>Comments:</Text>
            <TextView Value="{comments}" TextWrapping="Wrap" />

            <Button Text="Save" Clicked="{save}" />
            <Button Text="Cancel" Clicked="{cancel}" />
        </StackPanel>
    </ScrollView>
</Page>Pages/EditHikePage.js:
var Context = require("Modules/Context");

var hike = this.Parameter;

var name = hike.map(function(x) { return x.name; });
var location = hike.map(function(x) { return x.location; });
var distance = hike.map(function(x) { return x.distance; });
var rating = hike.map(function(x) { return x.rating; });
var comments = hike.map(function(x) { return x.comments; });

function cancel() {
    // Refresh hike value to reset dependent Observables' values
    hike.value = hike.value;
    router.goBack();
}

function save() {
    Context.updateHike(hike.value.id, name.value, location.value, distance.value, rating.value, comments.value);
    router.goBack();
}

module.exports = {
    name: name,
    location: location,
    distance: distance,
    rating: rating,
    comments: comments,

    cancel: cancel,
    save: save
};hikr.unoproj:
{
  "Packages": [
    "Fuse",
    "FuseJS"
  ],
  "Includes": [
    "*",
    "Modules/*.js:Bundle"
  ]
}
What's next
Now that all of the major parts of our app are in place, it's time to iteratively tweak the look and feel of our app to really make it pop. In the next chapter, we'll build various reusable components with a custom look/feel and sprinkle them all over our app to polish the app and make it look great. So let's get to it!
The final code for this chapter is available here.